When I introduce someone new to OpenStreetMap I often get asked how is it different from alternatives, such as Google Maps. One of the key differences is that our map data is supplied and incorporated by 1000s of volunteers, each one passionate about their local community or area of expertise. This means that our data is often rich in local knowledge, and is also frequently updated (as seen in speed by which the Humanitarian OpenStreetMap Team respond to changes caused natural disasters).
All this map data is fantastic, but if you cannot present it in the way you require, then you might as well not have it in the first place. This leads me to a second difference between OSM and other alternatives; namely all the underlying data is available to download and use for free. If you are not happy with the way the map looks, then you can you can use the data to create your own map. In this blog post, I introduce one such tool – Maperitive.
Question: What is Maperitive?
“Maperitive is a desktop application that renders maps in real time using OSM and other sources of data.” In essence we provide Maperitive with raw map data and a set of instructions describing how we would like the data to be displayed, and it draws (or renders) us a map.
Question: How to download and install?
There is no installation process as such. Simply download the latest version of the Maperitive zip file from http://maperitive.net/download/, unzip it into a directory of your choosing, and run it by double-click on maperitive.exe. (For non-Windows OS’s installation instructions can be found here).
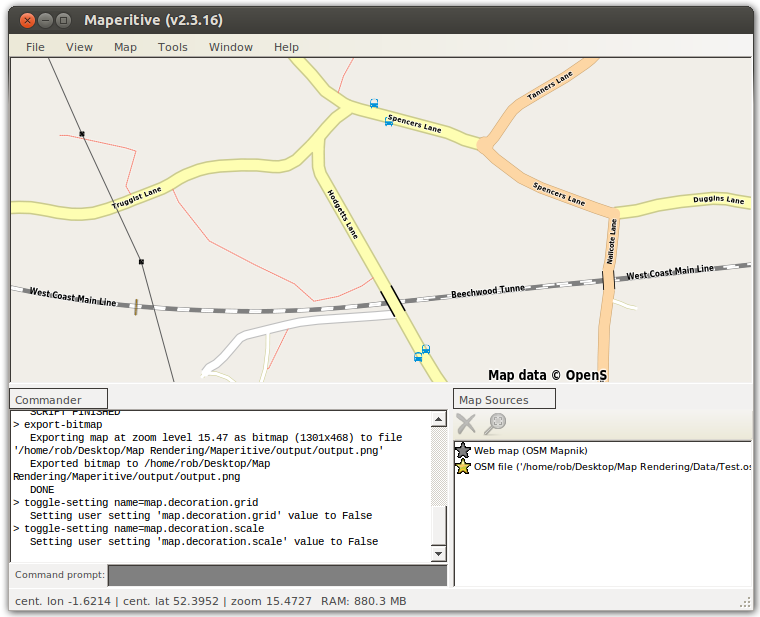
Question: I’ve downloaded and opened Maperitive, what am I looking at?
The user interface for Maperitive comprises of 4 parts. The majority of the window is taken up by the Map Area. By default this will be showing the standard OSM Map, or “Web Map” as can be seen in the Map Sources list in the bottom right hand corner. As we add more data this will appear in this list. The map can be moved by clicking and dragging, and zoomed by pressing the + and – keyboard keys (or using a mouse scroll-wheel).
At the top is the Menu Bar with drop down menus (File, View, etc..). Finally, in the bottom left is the Commander. Here we can enter instructions in the command prompt, however to keep things simple, we will only be using the Menu Bar to issue instructions in this blog post.
Question: How do I render my own map?
Before we can render a map, we must first get some map data. There are many ways to get OpenStreetMap data (we will explore these in a later blog post), including through Maperitive itself. For now we will use the OpenStreetMap.org website. Load the website and move to an area you are interested in. To download the data simply click “Export” and select “OpenStreetMap XML Data” as the download format.
Once you have downloaded some OSM data lets get Maperitive to render it. Start by clicking the star next to “Web Map” in the Map Sources list. This switches off the default map and the Map Areashould become a blank canvas ready for us to render a map. To do this open the downloaded map data using File->Open Map Sources…. Congratulations you have rendered your first map! By default the map will look very similar to the standard OSM map. We can however change this by selecting a different set of “rendering rules”. Try the different rules by selecting them using Map->Switch To Rules.
In a following blog post we will explore how to create your own rendering rules, and therefore customise your map to your liking. But for now lets finish by exporting the map to a PNG image. Choose Tools->Export To Bitmap. The location in which the image file was saved is shown at the bottom left, as the final line in the Commander.
Juan M Diaz Soto
Please. how could i draw, put or insert UTM coordinates on OSM to work with maperitive?
RobJN
Not sure exactly what you mean. If something is missing from OpenStreetMap the you can add it yourself using, for example, the iD map editor at openstreetmap.org (please only add real things/objects that exist on the ground).
If you are wanting to add non-map data then you may want to look into JOSM which can open and save .osm files (please be careful not to upload your non-map data back up to the openstreetmap website instead be sure to save to a file on your computer).