When Ilya approached the UK OpenStreetMap community about incorporating third party data (Shell petrol stations) into OSM he had already ran the data through his “OSM Conflator” tool. As part of the project he also created a “Community Validation” tool. I decided to take a look at both of these using Asda petrol station data as a test case.
In a series of posts I will share my experience with conflation and validation. This first post covers just OSM Conflator, with a follow on posts in the coming days covering the Community Validation tool and some reflections on the process.
Intro to OSM Conflator
OSM Conflator is a command-line tool written in Python 3 that compares a third party dataset against OpenStreetMap. It does not directly edit OpenStreetMap but instead gives you two outputs based on what it finds. The first, preview.json, can be loaded into an online tool such as geojson.io to visualise the differences. The second, a OSM change file, can be opened in JOSM for uploading in to OpenStreetMap. In both cases it assumes the third party data is correct and more up to date than any OSM data it is replacing. As such it is worth using the Community Validation tool to check the results before uploading.
For now the third party data must be point (node) data but it can match to both nodes and ways in OpenStreetMap; downloading the most recent data each time you run the script. The matching is initially done by distance and you can set the maximum tolerance (e.g. 100 meters). If the third party data has a unique reference key (e.g. a store ID number) then this can be added to OpenStreetMap the first time you merge the data. The next time you run the comparison, for example if a retail chain has changed their opening hours, then OSM Conflator relies on this reference key rather than having to undertake a proximity search.
Inputs
OSM Conflator requires two inputs: a profile and the third party data. The profile sets the search criteria and which third party tags should always replace values on matched OSM objects. In the case of the Asda petrol stations the search criteria was for ‘amenity=fuel’ objects within 100 meters. The tags to upload were ‘brand’, ‘opening_hours’, ‘website’, ‘phone’, ‘addr:street’, and ‘addr:postcode’. The data included a unique reference ID so I set the profile to write this to OSM.
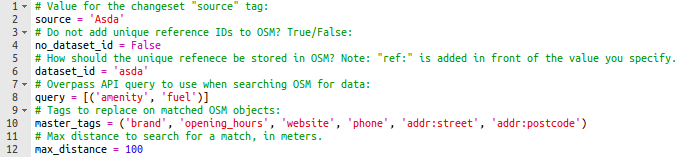
The profile is actually created as a Python file but is simple enough that you don’t need any Python experience. If you are however a pro at Python you can add to the profile. Example additions include tag transformations (e.g. reformatting telephone numbers in to ‘+44 <Area Code> <Number>’ format) or even code to download the source data direct from the third party’s website. If like me you are not a Python pro then you will need to provide OSM Conflator with a separate file including the third party data. This must be in a JSON file format.

Getting the third party data into a JSON file is easy when you know how. Prepare a table like the one above with columns for latitude (lat), longitude (lon) and, if you have it, the unique reference key (id). For the tags you wish to add to OpenStreetMap name the columns according to the standard tag usage within OSM adding ‘tags/’ in front of the column name. To convert your table into a JSON file simply copy and paste the data in to www.convertcsv.com/csv-to-json.htm making sure to select “First row is column names” and “Recreate nested objects and arrays” in the options. Copy the output into a blank notepad and save as ‘data.json’.
Running the tool
With the profile and third party data now prepared the final step is to run OSM Conflate. As noted this is a Python 3 command-line tool. I assume you have already installed this and have also installed ‘pip’ which is a package management system used to install and manage software packages written in Python. With both of these installed go ahead and open a command/terminal window and run “pip install osm_conflate” to install OSM Conflate. Finally to run OSM Conflate using your profile and data file run “conflate -i data.json -v -o result.osm -c preview.json profile.py”. When it has finished running try opening preview.json in geojson.io to get a visualisation of the results.
In the next post we will look at how to load the outputs in to the Community Validation tool.
Ken
Very cool. I wonder if they’ll ever release the dataset of all the nee drinking fountains being planned-. This tool looks like it would be useful if they do.
http://www.bbc.co.uk/news/uk-england-42808302
wambacher
nice tool – but where can i get it?
Ilya Zverev
wambacher, “pip install osm_conflate” in a console
more info at https://wiki.openstreetmap.org/wiki/OSM_Conflator